How to use the GroupedList component (AS3/Starling version)
The GroupedList class renders groups of items from a hierarchical data source. It includes support for selection, scrolling, custom layouts, layout virtualization, and custom item renderers, similar to the List or Tree components.
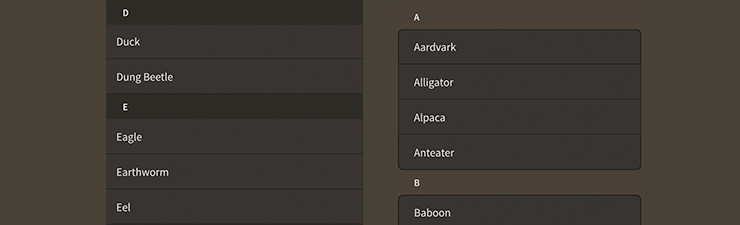
GroupedList components skinned with MetalWorksMobileThemeThe Basics
First, let's create our GroupedList control and add it to the display list:
var list:GroupedList = new GroupedList();
list.width = 250;
list.height = 300;
this.addChild( list );
Next, we want the grouped list to display some items, so let's create a ArrayHierarchicalCollection as its data provider. In the example below, a specially-formatted set of objects is passed to the ArrayHierarchicalCollection:
var groceryList:ArrayHierarchicalCollection = new ArrayHierarchicalCollection(
[
    {
        header: { text: "Dairy" },
        children:
        [
            { text: "Milk", thumbnail: textureAtlas.getTexture( "milk" ) },
            { text: "Cheese", thumbnail: textureAtlas.getTexture( "cheese" ) },
        ]
    },
    {
        header: { text: "Bakery" },
        children:
        [
            { text: "Bread", thumbnail: textureAtlas.getTexture( "bread" ) },
        ]
    },
    {
        header: { text: "Produce" },
        children:
        [
            { text: "Bananas", thumbnail: textureAtlas.getTexture( "bananas" ) },
            { text: "Lettuce", thumbnail: textureAtlas.getTexture( "lettuce" ) },
            { text: "Onion", thumbnail: textureAtlas.getTexture( "onion" ) },
        ]
    },
]);
list.dataProvider = groceryList;
ArrayHierarchicalCollection wraps a regular ActionScript Array, and it adds special events and things that the GroupedList uses to add, update, and remove item renderers in real time. The wrapped Array contains objects that represent the individual groups to display. Each group object has a children property (you can customize this property name, if you prefer) that contains another Array of the child objects in the group. Each group can also contain extra data for its header and footer, as we'll see in more detail shortly.
ArrayHierarchicalCollectionis one of multiple classes that implement theIHierarchicalCollectioninterface.IHierarchicalCollectionwraps any type of data to provide a common API that theGroupedListcomponent can understand. Out of the box, we may use these collection implementations:
ArrayHierarchicalCollectionfor data based on anArrayVectorHierarchicalCollectionfor data based on aVectorXMLListHierarchicalCollectionfor data based on anXMLListIt's even possible for anyone to create new
IHierarhicalCollectionimplementations to display custom data types, if needed.
Now, we need to tell the item renderers how to display the data. The grouped list simply passes each item from the data provider to an item renderer, and it is the item renderer's responsibility to interpret the properties of an item.
By default, a list renders items from the data provider using the DefaultGroupedListItemRenderer component. This default item renderer has many options for displaying strings, textures, and even adding display objects from the data provider as children. Let's look at a couple of these properties right now.
Start by taking a moment to review one of the items from the data provider:
{ text: "Milk", thumbnail: textureAtlas.getTexture( "milk" ) }
The item's text property contains a string, and the thumbnail property contains a texture. We can tell the default item renderer to use the values from these two properties to display two children: a label and an icon.
list.itemRendererFactory = function():IGroupedListItemRenderer
{
	var itemRenderer:DefaultGroupedListItemRenderer = new DefaultGroupedListItemRenderer();
	itemRenderer.labelField = "text";
	itemRenderer.iconSourceField = "thumbnail";
	return itemRenderer;
};
When using the labelField, the default item renderer will automatically create a text renderer to display the string. Similarly, when you use the iconSourceField, the item renderer will automatically create an ImageLoader to display the texture. You may also use iconSourceField to ask the ImageLoader to display an image loaded from a URL instead of a texture. The value is passed to the source property of the ImageLoader.
The default item renderers can support up to three children, including a label, an icon, and a third one, called an accessory. In addition to labelField and iconSourceField properties, a default item renderer's children may be customized with several other similar properties. Please see How to use the default Feathers item renderer with List, DataGrid, Tree, and GroupedList for complete details.
Headers and Footers
The main difference between lists and grouped lists is that items in the grouped lists are divided into groups. These groups typically have a header, and you may optionally add a footer as well. For instance, if you have items in the list grouped alphabetically, the headers might display the letters of the alphabet, like A, B, C, etc. For the footer, you might provide instructions, a description of the group, or other clarifying information.
Just like items, headers and footers have renderers. In fact, they both use the same renderer by default, DefaultGroupedListHeaderOrFooterRenderer. This is a renderer that may display a label, an image, or any Starling display object, depending on which properties you set.
That doesn't mean that header and footer renderers always need to be the same type. They can be different, if you prefer. Custom header and footer renderers simply need to implement the IGroupedListHeaderOrFooterRenderer interface.
To customize what content is passed to the header from a group in the data provider, you can use the headerField or headerFunction properties.
Consider the following group from the data provider:
{
    header: { text: "Bakery" },
    children:
    [
        { text: "Bread", thumbnail: textureAtlas.getTexture( "bread" ) },
    ]
}
For the list to display the text in the header, it needs to know about the group's header property:
list.headerField = "header";
Using the data provider in the example above, we tell the grouped list to pass the header property of the group to the header renderer.
For footers, a grouped list provides footerField and footerFunction properties.
Once the header or footer renderer has its data, it may need to drill down further into the properties, similar to an item renderer. The default header and footer renderer has a contentLabelField property that is similar to the item renderer's labelField property.
list.headerRendererFactory = function():IGroupedListHeaderRenderer
{
	var headerRenderer:DefaultGroupedListHeaderOrFooterRenderer = new DefaultGroupedListHeaderOrFooterRenderer();
	headerRenderer.contentLabelField = "text";
	return headerRenderer;
};
Check the DefaultGroupedListHeaderOrFooterRenderer API reference for full details about how to display other types of children (instead of a text renderer) in the default header or footer renderer.
Selection
The GroupedList component may have one selected item. You can access information about selection through a combination of the selectedGroupIndex and selectedItemIndex properties. You can also access the selectedItem property. If there is no selection, the value of selectedGroupIndex and selectedItemIndex will be -1 and the value of selectedItem will be null.
To listen for when the selection changes, listen to the Event.CHANGE event:
list.addEventListener( Event.CHANGE, list_changeHandler );
The listener might look something like this:
private function list_changeHandler( event:Event ):void
{
    var list:GroupedList = GroupedList( event.currentTarget );
    trace( "selectedGroupIndex:", list.selectedGroupIndex, "selectedItemIndex:", list.selectedItemIndex );
}
You can manually change the selection, if needed:
list.setSelectedLocation(0, 4);
Selection indices start at 0, so the above code would select the fifth item in the first group.
If you prefer, you can change selection by passing in an item from the data provider:
list.selectedItem = item;
If needed, you can clear selection manually:
list.setSelectedLocation(-1, -1);
To disable selection completely, use the isSelectable property:
list.isSelectable = false;
Skinning a GroupedList
A grouped list has a background skin and a layout. Much of the ability to customize the appearance of a list exists inside the item renderer components, such as their font styles and backgrounds for different states. For full details about which properties are available, see the GroupedList API reference. We'll look at a few of the most common ways of styling a list below.
Background skin
We can give the list a background skin that fills the entire width and height of the list. In the following example, we pass in a starling.display.Image, but the skin may be any Starling display object:
var skin:Image = new Image( texture );
skin.scale9Grid = new Rectangle( 2, 2, 1, 6 );
header.backgroundSkin = skin;
It's as simple as setting the backgroundSkin property.
We can give the list a different background when it is disabled:
var skin:Image = new Image( texture );
skin.scale9Grid = new Rectangle( 1, 3, 2, 6 );
list.backgroundDisabledSkin = skin;
The backgroundDisabledSkin is displayed when the grouped list is disabled. If the backgroundDisabledSkin isn't provided to a disabled grouped list, it will fall back to using the backgroundSkin in the disabled state.
Layout
Padding may be added around the edges of the grouped list's content. This padding is different than any type of padding that may be provided by the layout property. The layout padding is applied inside the grouped list's content, but the grouped list's padding is applied outside of the content, and is generally used to show a bit of the background as a border around the content.
list.paddingTop = 15;
list.paddingRight = 20;
list.paddingBottom = 15;
list.paddingLeft = 20;
If all four padding values should be the same, you may use the padding property to quickly set them all at once:
list.padding = 20;
The default layout for a grouped list is to display the items vertically one after the other. We can change that to a horizontal layout, a tiled layout, or even a completely custom layout algorithm. Let's switch to a HorizontalLayout and customize it a bit:
var layout:HorizontalLayout = new HorizontalLayout();
layout.verticalAlign = VerticalAlign.JUSTIFY;
layout.gap = 10;
layout.padding = 15;
list.layout = layout;
When the grouped list automatically defaults to a VerticalLayout, it also updates its scroll policy so that it will scroll vertically with elastic edges and will only scroll horizontally if the content is larger than the view port. If we're switching to a horizontal layout, the scroll policies won't be updated automatically, so we should also manually adjust the scroll policies:
list.horizontalScrollPolicy = ScrollPolicy.AUTO;
list.verticalScrollPolicy = ScrollPolicy.OFF;
Layout Virtualization
Generally, a grouped list will use something called layout virtualization by default because it offers significant performance improvements. When using a virtual layout, a grouped list will display a limited number of item renderers at a time (usually only those that are visible in the view port) to avoid using massive amounts of memory. This means that data providers can contain thousands, or even tens of thousands, of items without a large performance impact. Additionally, the grouped list will reuse that small number of item renderers to display different items as it scrolls. This keeps the runtime from creating many temporary objects that need to be garbage collected. To learn more, see FAQ: What is layout virtualization?
Skinning the Scroll Bars
This section only explains how to access the horizontal scroll bar and vertical scroll bar sub-components. Please read How to use the ScrollBar component (or SimpleScrollBar) for full details about the skinning properties that are available on scroll bar components.
With a Theme
If you're creating a theme, you can target the Scroller.DEFAULT_CHILD_STYLE_NAME_HORIZONTAL_SCROLL_BAR style name for the horizontal scroll bar and the Scroller.DEFAULT_CHILD_STYLE_NAME_VERTICAL_SCROLL_BAR style name for the vertical scroll bar.
getStyleProviderForClass( ScrollBar )
    .setFunctionForStyleName( Scroller.DEFAULT_CHILD_STYLE_NAME_HORIZONTAL_SCROLL_BAR, setHorizontalScrollBarStyles );
getStyleProviderForClass( ScrollBar )
    .setFunctionForStyleName( Scroller.DEFAULT_CHILD_STYLE_NAME_VERTICAL_SCROLL_BAR, setVerticalScrollBarStyles );
The styling function for the horizontal scroll bar might look like this:
private function setHorizontalScrollBarStyles(scrollBar:ScrollBar):void
{
    scrollBar.trackLayoutMode = TrackLayoutMode.SINGLE;
}
You can override the default style names to use different ones in your theme, if you prefer:
list.customHorizontalScrollBarStyleName = "custom-horizontal-scroll-bar";
list.customVerticalScrollBarStyleName = "custom-vertical-scroll-bar";
You can set the function for the customHorizontalScrollBarStyleName and the customVerticalScrollBarStyleName like this:
getStyleProviderForClass( ScrollBar )
    .setFunctionForStyleName( "custom-horizontal-scroll-bar", setCustomHorizontalScrollBarStyles );
getStyleProviderForClass( ScrollBar )
    .setFunctionForStyleName( "custom-vertical-scroll-bar", setCustomVerticalScrollBarStyles,  );
Without a Theme
If you are not using a theme, you can use horizontalScrollBarFactory and verticalScrollBarFactory to provide skins for the list's scroll bars:
list.horizontalScrollBarFactory = function():ScrollBar
{
    var scrollBar:ScrollBar = new ScrollBar();

    //skin the scroll bar here, if not using a theme
    scrollBar.trackLayoutMode = TrackLayoutMode.SINGLE;

    return scrollBar;
}
Skinning the Item Renderers
This section only explains how to access the item renderer sub-components. Please read How to use the default Feathers item renderer with List, DataGrid, Tree, and GroupedList for full details about the skinning properties that are available on the default item renderers.
Custom item renderers may be accessed similarly, but they won't necessarily have the same styling properties as the default item renderers. When using custom item renderers, you may easily replace references to the DefaultGroupedListItemRenderer class in the code below with references to your custom item renderer class.
With a Theme
If you are creating a theme, you can set a function for the default styles like this:
getStyleProviderForClass( DefaultGroupedListItemRenderer ).defaultStyleFunction = setItemRendererStyles;
The styling function might look like this:
private function setItemRendererStyles(itemRenderer:DefaultListItemRenderer):void
{
    var skin:ImageSkin = new ImageSkin( upTexture );
    skin.setTextureForState( ButtonState.DOWN, downTexture );
    skin.scale9Grid = new Rectangle( 2, 2, 1, 6 );
    itemRenderer.defaultSkin = skin;
    itemRenderer.fontStyles = new TextFormat( "Helvetica", 20, 0xc3c3c3 );
}
If you want to customize a specific item renderer to look different than the default, you may use a custom style name to call a different function:
list.customItemRendererStyleName = "custom-item-renderer";
You can set the function for the custom customItemRendererStyleName like this:
getStyleProviderForClass( DefaultGroupedListItemRenderer )
    .setFunctionForStyleName( "custom-item-renderer", setCustomItemRendererStyles );
To customize the appearance of the first, last, and a single item renderer in a group, use the customFirstItemRendererStyleName, customLastItemRendererStyleName, and customSingleItemRendererStyleName properties. Changing the appearance of these item renderers to look different from the others is completely optional.
Without a theme
If you are not using a theme, you can use itemRendererFactory to provide skins for the grouped list's item renderers:
list.itemRendererFactory = function():IGroupedListItemRenderer
{
    var itemRenderer:DefaultGroupedListItemRenderer = new DefaultGroupedListItemRenderer();

    //set item renderer styles here, if not using a theme
    var skin:ImageSkin = new ImageSkin( upTexture );
    skin.setTextureForState( ButtonState.DOWN, downTexture );
    skin.scale9Grid = new Rectangle( 2, 2, 1, 6 );
    itemRenderer.defaultSkin = skin;
    itemRenderer.fontStyles = new TextFormat( "Helvetica", 20, 0xc3c3c3 );

    return itemRenderer;
}
Custom Item Renderers
If the default item renderer doesn't have the features that you need, the GroupedList component offers the ability to use custom item renderers instead. Custom item renderers must be Feathers components that implement the IGroupedListItemRenderer interface.
For full details about implementing custom item renderers, see Creating custom item renderers for the Feathers
ListandGroupedListcomponents.
The easiest way to tell a grouped list to display its data using a custom item renderer is to set the itemRendererType property:
list.itemRendererType = ExampleCustomItemRenderer;
Sometimes, you might want to change some properties on each item renderer as it is created. You can use the itemRendererFactory property instead of itemRendererType to call a function that returns a newly created item renderer:
list.itemRendererFactory = function():IGroupedListItemRenderer
{
    var itemRenderer:ExampleCustomItemRenderer = new ExampleCustomItemRenderer();
    itemRenderer.exampleProperty = 20;
    return itemRenderer;
}
First, Last, and Single Item Renderers
With a grouped list, it's often desirable to give the first and last items renderers in the group a slightly different style. Groups with only one item may give the item renderer a different style as well. For instance, on iOS, it's common to see a similar component to grouped list on settings screens. Each group may add rounded corners on first and last in a group, and on item renderers in groups with only one item.
The following properties will allow you to customize these special item renderers. Providing a different style for these item renderers is completely optional.
Each of the type and factory properties work similarly to the itemRendererType and itemRendererFactory properties.
Custom Header and Footer Renderers
To pass in a custom header renderer, use the headerRendererType property, similar to the itemRendererType property:
list.headerRendererType = ExampleCustomHeaderRenderer;
You can also use a headerRendererFactory, similar to itemRendererFactory:
list.headerRendererFunction = function():IGroupedListHeaderOrFooterRenderer
{
    var headerRenderer:ExampleCustomHeaderRenderer = new ExampleCustomHeaderRenderer();
    headerRenderer.exampleProperty = 20;
    return headerRenderer;
}
To customize the type or properties of footer renderers, you can use footerRendererType or footerRendererFactory.
Multiple item renderer factories
A list may display differnent item renderers for different items in the data provider. We can use the setItemRendererFactoryWithID() method to pass in more than one item renderer factory:
function regularItemFactory():IGroupedListItemRenderer
{
    return new DefaultGroupedListItemRenderer();
}
list.setItemRendererFactoryWithID( "regular-item", regularItemFactory );

function headerItemFactory():IGroupedListItemRenderer
{
    return new CustomItemRenderer();
}
list.setItemRendererFactoryWithID( "header-item", listHeaderFactory );
Each factory should be given a unique String identifier. We'll use these values in a moment.
The factoryIDFunction is used to determine which item renderer factory should be used for a particular item. In the example below, we use factoryIDFunction to give the first item in the data provider a different item renderer than the other items:
list.factoryIDFunction = function( item:Object, index:int ):String
{
    if(index == 0)
    {
        return "header-item";
    }
    return "regular-item";
};
This function should accept two arguments. The first is the item from the data provider, and the second is the item's index in the data provider. We can use this index, or one of the properties of the item, to determine which item renderer factory to use. The function should return one of the String identifiers that we passed to setItemRendererFactoryWithID().
GroupedList also provides setHeaderRendererFactoryWithID() and headerFactoryIDFunction for header renderers. Similarly, we can use setFooterRendererFactoryWithID() and footerFactoryIDFunction for footer renderers.
Customize scrolling behavior
A number of properties are available to customize scrolling behavior and the scroll bars.
Interaction Modes
Scrolling containers provide two main interaction modes, which can be changed using the interactionMode property.
By default, you can scroll using touch, just like you would on many mobile devices including smartphones and tablets. This mode allows you to grab the container anywhere within its bounds and drag it around to scroll. This mode is defined by the constant, ScrollInteractionMode.TOUCH.
Alternatively, you can set interactionMode to ScrollInteractionMode.MOUSE. This mode allows you to scroll using the horizontal or vertical scroll bar sub-components. You can also use the mouse wheel to scroll vertically.
Finally, you can set interactionMode to ScrollInteractionMode.TOUCH_AND_SCROLL_BARS. This mode allows you to scroll both by dragging the container's content and by using the scroll bars.
Scroll Bar Display Mode
The scrollBarDisplayMode property controls how and when scroll bars are displayed. This value may be overridden by the scroll policy, as explained below.
The default value is ScrollBarDisplayMode.FLOAT, which displays the scroll bars as an overlay above the view port's content, rather than affecting the size of the view port. When the scroll bars are floating, they fade out when the container is not actively scrolling. This is a familiar behavior for scroll bars in the touch interaction mode. In the mouse interaction mode, the scroll bars will appear when the mouse hovers over them and then disappear when the hover ends.
To completely hide the scroll bars, but still allow scrolling, you can set scrollBarDisplayMode to ScrollBarDisplayMode.NONE.
If you want the scroll bars to always be visible outside of the content in a fixed position, you can set scrollBarDisplayMode to ScrollBarDisplayMode.FIXED. This is best for traditional desktop scrollable content.
Finally, you can set scrollBarDisplayMode to ScrollBarDisplayMode.FIXED_FLOAT to display the scroll bar as an overlay above the view port's content, but it does not fade away.
Scroll Policies
The two previous properties control how scrolling works. The horizontalScrollPolicy and verticalScrollPolicy properties control whether scrolling is enabled or not.
The default scroll policy for both directions is ScrollPolicy.AUTO. If the content's width is greater than the view port's width, the container may scroll horizontally (same for height and vertical scrolling). If not, then the container will not scroll in that direction. In addition to the scrollBarDisplayMode, this can affect whether the scroll bar is visible or not.
You can completely disable scrolling in either direction, set the scroll policy to ScrollPolicy.OFF. The scroll bar will not be visible, and the container won't scroll, even if the content is larger than the view port.
Finally, you can ensure that scrolling is always enabled by setting the scroll policy to ScrollPolicy.ON. If combined with hasElasticEdges in the touch interaction mode, it will create a playful edge that always bounces back, even when the content is smaller than the view port. If using the mouse interaction mode, the scroll bar may always be visible under the same circumstances, though it may be disabled if the content is smaller than the view port.
Paging
Set the snapToPages property to true to make the scroll position snap to the nearest full page. A page is defined as a multiple of the view ports width or height. If the view port is 100 pixels wide, then the first horizontal page starts at 0 pixels, the second at 100, and the third at 200.
The pageWidth and pageHeight properties may be used to customize the size of a page. Rather than using the full view port width or height, any pixel value may be specified for page snapping.